Gravity Water-Filter Stand: Floor and Countertop (Proposed)
A proposed build: a hardwood stand for a gravity-fed stainless water filter (Berkey, British Berkefeld or anything of that size). It comes in two heights from one construction: a floor stand with a shelf for a tumbler or pitcher under the spigot, and a countertop stand that lifts the filter just high enough to get a glass under it. Everything is square stock, mortise-and-tenon and table-saw cuts, with no turning, no compound angles and no curves.
The look comes from your two reference photos: four legs that rise past the platform as posts to keep the filter from walking off (the cherry stand), and a plain four-leg frame with the filter sitting down inside it (the ceramic-crock stand). The shelf for a tumbler is borrowed from the cherry one too.
Provenance of the numbers. (stated) = from you: a floor stand for a Berkey-sized filter, a countertop version too, built on a table saw. (maker) = the filter makers’ published sizes, rounded; sources disagree by up to an inch, so measure your own filter before cutting (see Fit). (chosen) = a design decision of mine. (derived) = worked out from those so everything closes. (est.) = a guess I couldn’t verify (spigot reach, weight), flagged in Open questions. The drawings come from
tools/woodworking/water_filter_stand_drawings.py; change a constant there and the SVGs and cut-list numbers move together.
Renderings
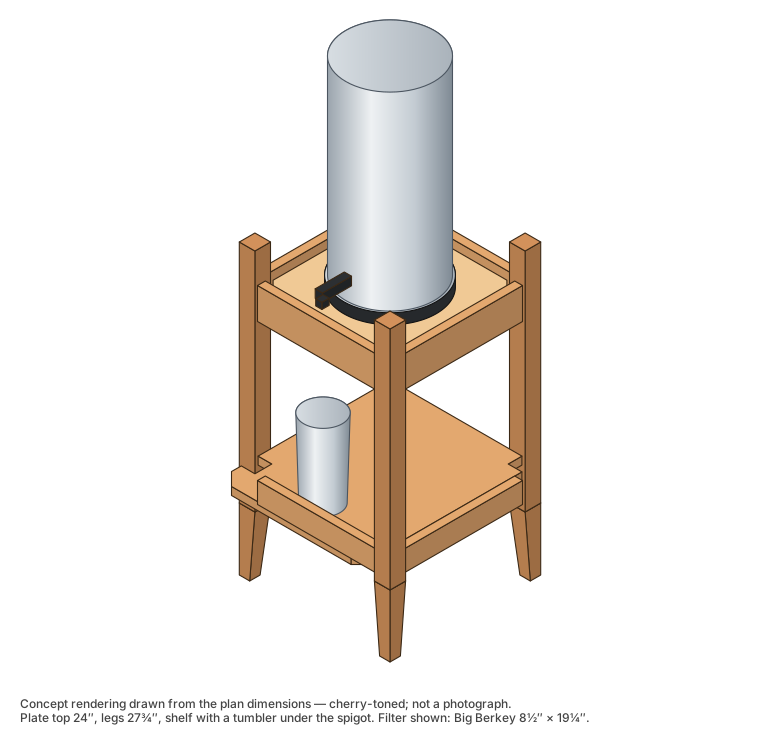
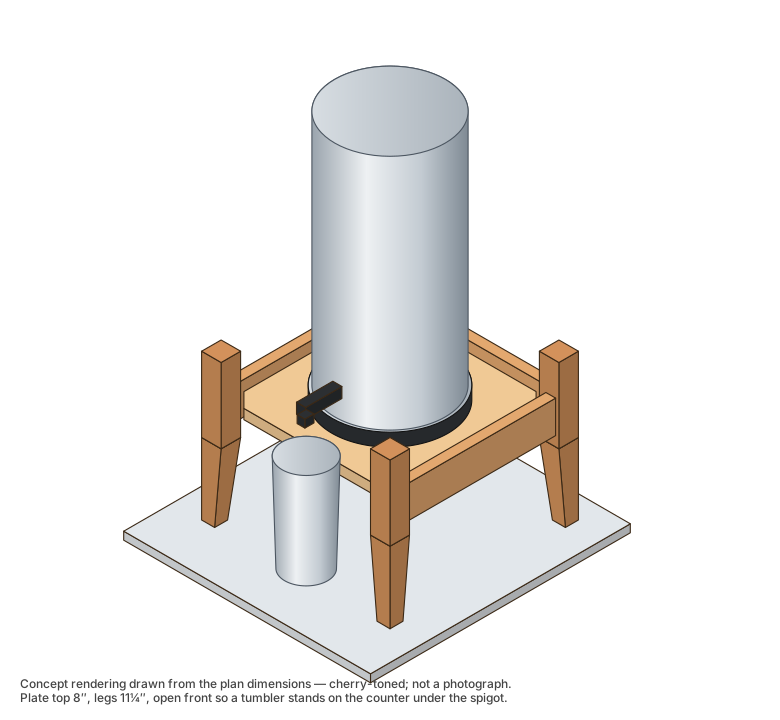
Concept views drawn from the plan dimensions (a Big Berkey is shown). They are illustrations, not photographs. Click any figure to open it full size.
Floor stand
Countertop stand
Design in one paragraph
Four 1½″ square legs sit 14½″ apart outside (11½″ between). A ¾″ × 3″ apron is tenoned between them, with its top edge ¾″ proud of a drop-in plate, so the filter sits in a shallow tray whose walls are the aprons and whose four corners are the legs, which stand 3″ above the aprons as posts. Under the plate the aprons carry ¾″ cleats. A lower rail frame at the floor stand’s 6½–8½″ height supports a ¾″ shelf that reaches 9½″ to the front, so a tumbler can stand directly under the spigot. The countertop stand is the same top frame on 8″ legs with no front apron, so the cup can sit on the counter in front of the stand.
The feet taper on their two inside faces from 1½″ to 1″, which is the only shaped cut on the legs.
Fit: which filters this takes
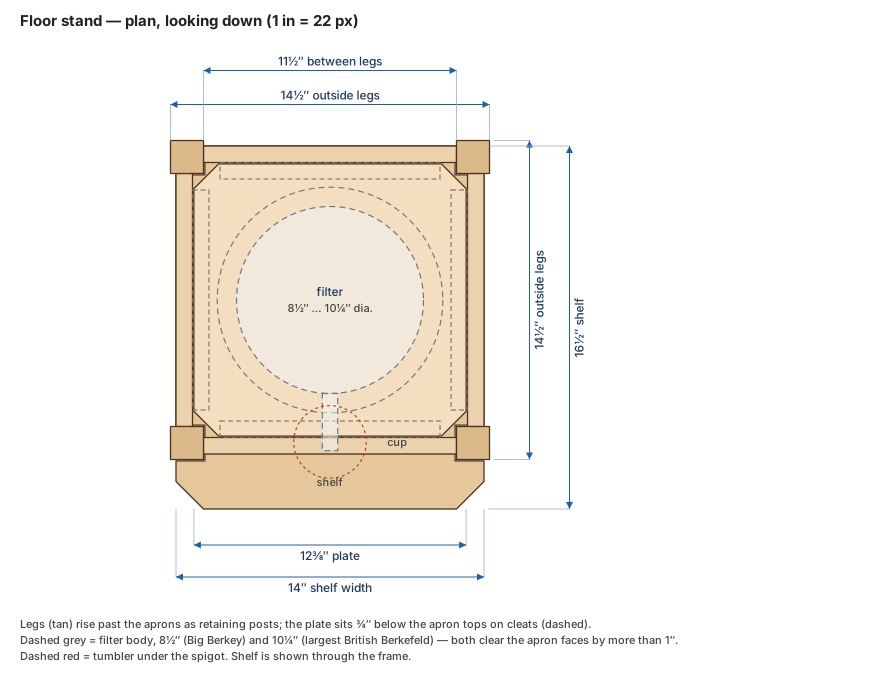
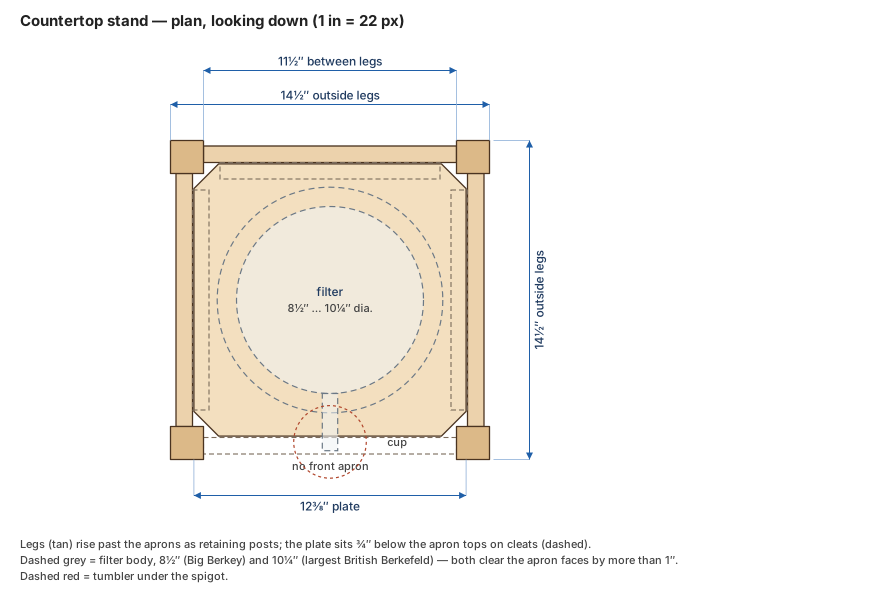
The frame’s opening (between the aprons) is 12½″ square; the plate is 12⅜″. Filter sizes are the makers’ published figures, rounded (the Berkey site gives its own sizes, and retailers disagree by about an inch on height).
| Filter | Dia. | Height | Gap to apron, each side | Total height, floor stand | Total height, countertop |
|---|---|---|---|---|---|
| Travel Berkey (1.5 gal) | 7½″ | 18″ | 2½″ | 42″ | 26″ |
| Big Berkey (2.25 gal) | 8½″ | 19¼″ | 2″ | 43¼″ | 27¼″ |
| Royal Berkey (3.25 gal) | 9½″ | 23″ | 1½″ | 47″ | 31″ |
| Imperial Berkey (4.5 gal) | 10″ | 26″ | 1¼″ | 50″ | 34″ |
| British Berkefeld stainless 8.5 L (~2.25 gal) | 10¼″ (260 mm; Doulton lists 224 mm) | ~19¼″ | 1⅛″ | 43⅜″ | 27⅜″ |
| British Berkefeld stainless 12 L | 9¾″ (246 mm) | ~23¾″ | 1⅜″ | 47¾″ | 31¾″ |
| Crown Berkey (6 gal) | 11″ | 30″ | ¾″ | 54″ | 38″ |
- Up to the Royal / British Berkefeld 12 L fits as drawn. Crown and Imperial are tight on width and very tall on the floor stand: widen the frame by 1″ (move the legs out ½″ each way:
IN_HALF = 6.25) and, for the floor stand, drop the plate height to 20″ so the top lid stays under about 50″. The black base ring on a Berkey flares about ¼″ wider than the body, so check that too. - Why the 1″+ gap matters: the filter should drop in without scraping, and the base ring and spigot need room. The posts, not the gap, keep it from walking, so a loose fit is fine.
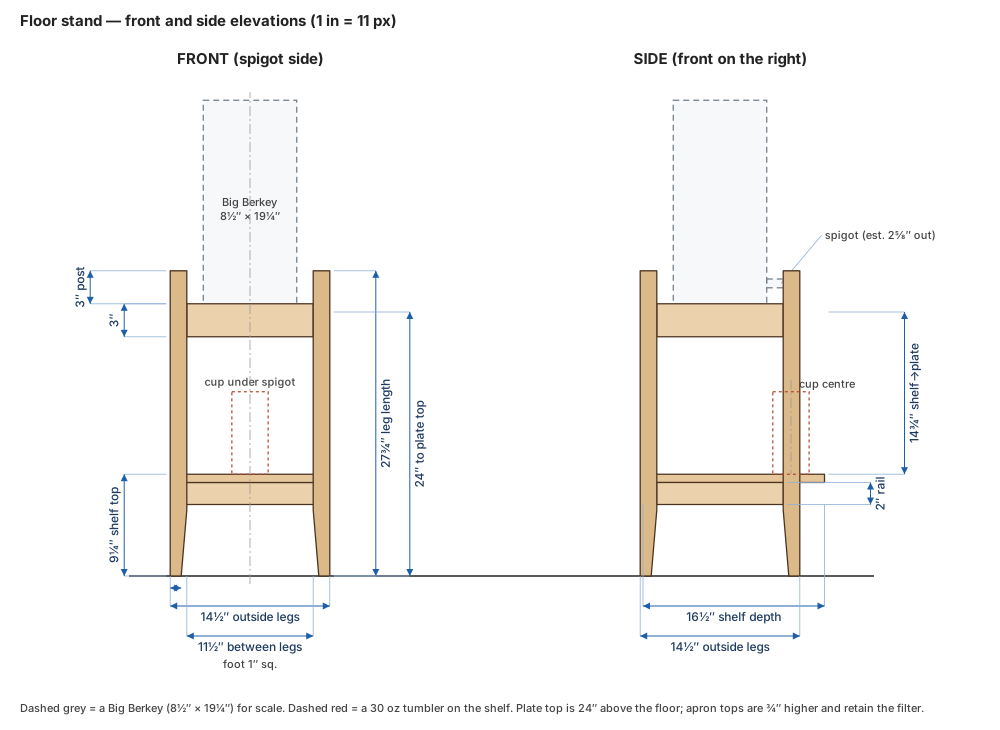
Drawings (true scale)
Floor stand — front and side
Floor stand — plan
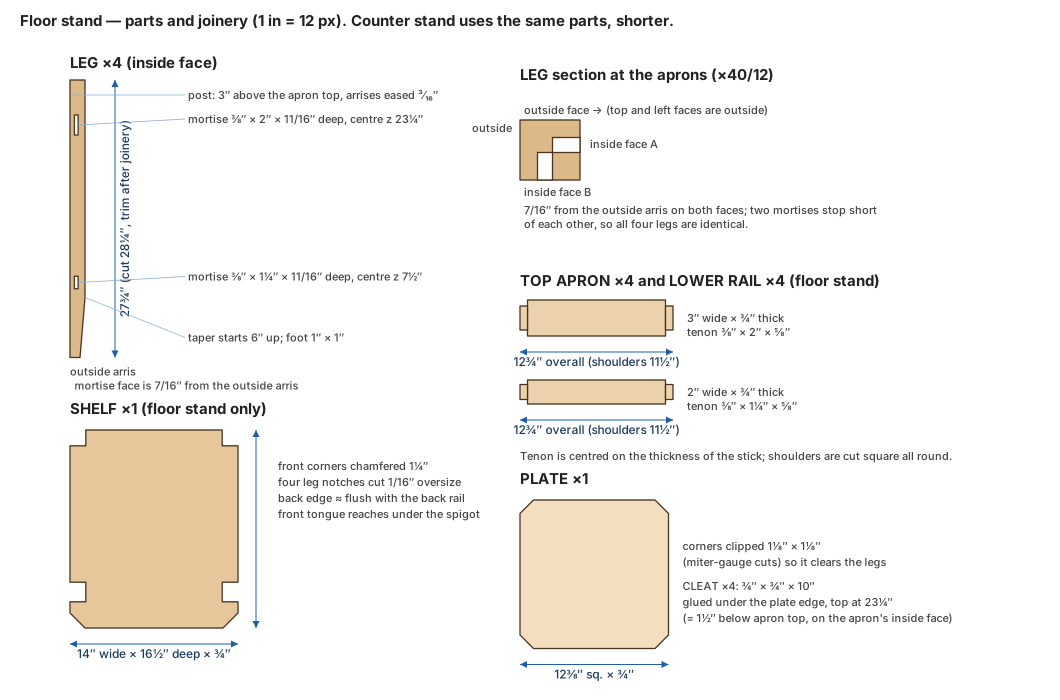
Floor stand — parts and joinery
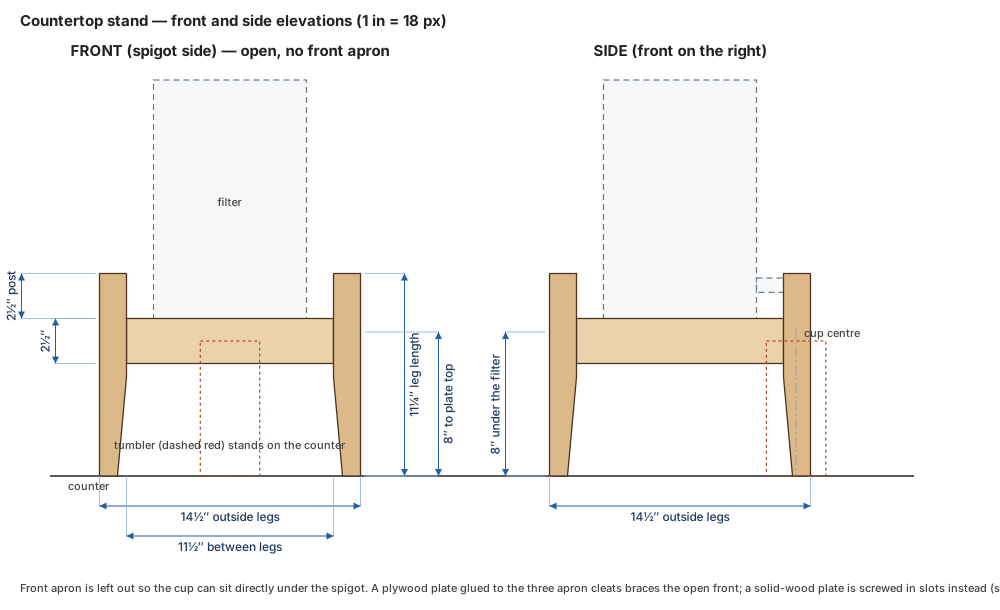
Countertop stand — front and side
Countertop stand — plan
The numbers
| Item | Floor stand | Countertop stand |
|---|---|---|
| Leg | 1½″ square × 27¾″ | 1½″ square × 11¼″ |
| Outside / between legs | 14½″ / 11½″ (chosen) | same |
| Plate top above floor/counter | 24″ (chosen) | 8″ (chosen) |
| Apron top (¾″ above the plate) | 24¾″ | 8¾″ |
| Apron | ¾″ × 3″ (underside at 21¾″) | ¾″ × 2½″ (underside at 6¼″); no front apron |
| Posts above the apron top | 3″ | 2½″ |
| Lower rails / shelf top | rails 6½–8½″, shelf top 9¼″ | none |
| Under the spigot | shelf 9¼″ to the front apron’s underside 21¾″ = 12½″ clear | 8″ plate + the spigot’s height on the filter (est. 2″) = about 9½″ clear |
| Foot | tapers to 1″ square from 6″ up | tapers to 1″ square from 5½″ up |
| Inside faces are in | 5¾″ from the centre | same |
How the pieces close:
| Derived | Working | Result |
|---|---|---|
| Leg outside | 2 × (5¾″ + 1½″) | 14½″ |
| Apron outside face | leg outside − ¼″ setback | 14″ (¼″ reveal on each side) |
| Apron inside face | 14″ − 2 × ¾″ | 12½″ between aprons |
| Apron length | 11½″ between legs + 2 × ⅝″ tenons | 12¾″ |
| Mortise position | ¼″ setback + (¾″ − ⅜″) ÷ 2 | 7/16″ from the outside arris |
| Plate | 12½″ − 2 × 1/16″ clearance | 12⅜″ square, ¾″ thick |
| Corner clip | leaves about 3/16″ between the clip and the leg’s inside corner | 1⅛″ at 45° |
| Plate top | apron top − ¾″ | 24″ (floor) / 8″ (counter) |
| Cleat top | plate top − ¾″ | 23¼″ / 7¼″ |
| Leg length (floor) | 24¾″ + 3″ | 27¾″ |
| Leg length (counter) | 8¾″ + 2½″ | 11¼″ |
Both mortises in a leg are cut ⅝″ + 1/16″ deep into adjacent faces. The apron setback puts them 7/16″ from the outside arris, so the two cavities touch at one corner point but never overlap. All four legs are identical.
Cut list: floor stand
Stock: cherry, walnut, white oak or maple (the photos are cherry). Finished sizes; mill a little long and trim to length after the joinery is cut.
| Part | Qty | T × W × L | Notes |
|---|---|---|---|
| Legs | 4 | 1½″ × 1½″ × 27¾″ | Cut blanks 28¼″. Two mortises each (see the parts drawing); taper the inside faces below 6″; ease all arrises 3/16″ |
| Top aprons | 4 | ¾″ × 3″ × 12¾″ | Tenon ⅜″ × 2″ × ⅝″ both ends, centred. Same four, front and back included |
| Lower rails | 4 | ¾″ × 2″ × 12¾″ | Tenon ⅜″ × 1¼″ × ⅝″, centred. Top edge at 8½″ |
| Plate | 1 | ¾″ × 12⅜″ × 12⅜″ | Corners clipped 1⅛″ × 1⅛″ at 45° |
| Plate cleats | 4 | ¾″ × ¾″ × 10″ | Glued on each apron’s inside face, top 1½″ below the apron top (at 23¼″) |
| Shelf | 1 | ¾″ × 14″ × 16½″ | Four leg notches (cut 1/16″ oversize), front corners chamfered 1¼″; see the parts drawing |
Board feet: about 7½ net; buy about 10 bd ft (8/4 for the legs, 4/4 for the rest). The countertop stand is about 3 net, so buy 4–5 bd ft.
Cut list: countertop stand
The same parts, with the front apron and lower rail frame left out and the legs and aprons shortened.
| Part | Qty | T × W × L | Notes |
|---|---|---|---|
| Legs | 4 | 1½″ × 1½″ × 11¼″ | Mortise ⅜″ × 1½″ × ¹¹⁄₁₆″, centre 7½″ up; taper from 5½″ up to 1″ |
| Aprons (left, right, back) | 3 | ¾″ × 2½″ × 12¾″ | Tenon ⅜″ × 1½″ × ⅝″. No front apron |
| Plate | 1 | ¾″ × 12⅜″ × 12⅜″ | Same shape as the floor stand’s. Plywood glued down braces the open front; see Plate below |
| Plate cleats | 3 | ¾″ × ¾″ × 10″ | Under the plate on the left, right and back aprons. Cleat top at 7¼″ |
| Feet | 4 | felt or rubber pads | Protects the counter. A small dab of bumper adhesive is enough |
Build sequence
- Mill the legs to 1½″ square (glue up 8/4 or laminate two 4/4 pieces if you only have thin stock; the grain shows on all four faces, so quartersawn or rift stock looks best). Mill the aprons, rails, plate, cleats and shelf stock to ¾″.
- Lay out all mortises on one leg and copy to the others. Both inside faces get one; they sit 7/16″ from the outside arris on each face. Use a story stick so the four legs come out identical. Cut the mortises ⅜″ wide × the heights in the cut list × 11/16″ deep (router and a fence, a hollow-chisel mortiser, or drill and chisel).
- Cut the tenons on the table saw. Make cheek cuts with a tenoning jig (the miter-slot tenoning jig on this site works) or a stack dado, then the shoulders on a crosscut sled with a stop block. Cut them ⅜″ thick, ⅝″ long. Fit to the mortise and ease the tenon’s edges so the apron seats fully.
- Taper the feet. Mark the line 6″ up the inside faces (5½″ for the counter stand) and the 1″ square at the foot. Use a table-saw taper jig for each inside face, or the band saw, and finish with a plane. Do this after the mortises, since the taper is below them.
- Cut the plate and shelf. Clip the plate’s corners 1⅛″ at 45° with the miter gauge. Cut the shelf to 14″ × 16½″, notch the four leg corners with a crosscut and a rip (or a jigsaw), and chamfer the front corners 1¼″. Notch 1/16″ oversize so it never binds on the legs.
- Glue the cleats to the apron inside faces, ¾″ × ¾″ × 10″, with their top edge 1½″ below the apron top (floor stand) or at 7¼″ (counter stand). Do this before assembly while the aprons are flat on the bench.
- Dry-fit, then assemble in two stages. Glue the two side frames first (two legs, top apron, lower rail each), check them square and identical, then join them with the front and back aprons and rails. Check the diagonals of the top frame between the apron inside faces: they should match at about 17⅝″ (12½″ × √2). Clamp across the legs. A drawbore pin (⅛″ dowel) in each tenon is cheap insurance for a stand that gets bumped.
- Fit the plate. Set it on the cleats and check the gap (1/16″ each side). Fasten it as described below. On the floor stand, fasten the shelf to the lower rails the same way.
- Sand and finish before the filter goes on (see Finish).
- Check for rock. Stand it on a flat floor or counter and shim or sand a foot if it rocks. Then wall-anchor it (see Stability).
Plate
The plate needs to stay put without trapping seasonal movement:
- Plywood (¾″ hardwood-faced ply, edges banded or just oiled): glue and screw it to the cleats. It doesn’t move, and on the countertop stand it braces the open front.
- Solid wood moves roughly ⅛″ across 12″ over a year. Screw it down with slotted holes in the cleats’ long direction, never glue it, and keep 1/16″ clear of the aprons. The countertop stand’s open front then relies on its glued and drawbored tenons alone. That is plenty for an 11″-tall stand, because there is little leverage to rack it, and a stretcher in the front would block the cup, so don’t add one.
Finish
Water will drip on this stand. Use something water-resistant: wipe-on or spray polyurethane, spar varnish, or a hardwax oil, with at least three coats on the plate, the shelf and the top edge of the aprons. Seal the underside of the plate and shelf as well as the top, or the unfinished side will cup. A stainless filter also sweats in a humid room; a thin cork or felt disk under the base ring keeps the finish from marking.
Stability and safety
- Load: a full filter plus its water is roughly 30–65 lb depending on size (est.). The plate is ¾″ hardwood on cleats around all four edges; at that load it is plenty stiff. Don’t build it thinner.
- Tipping: with a full Big Berkey on the plate (centre of mass about 32″ up), the floor stand tips at about 13° from vertical, so a hard shove at the top could do it. Anchor it to the wall: two small L-brackets (or a ⅛″ brass strap) from a back leg to the wall stud.
- Countertop: it is low and stable on its own, but the total height is 27–34″, so check the clearance under any wall cabinet before choosing it. A Big Berkey is just over 27″ on it.
- Posts: the 3″ posts are retainers, not a restraint. A child can pull a filter off by the spigot; if that matters in your house, anchor the stand and add a strap or a bracket.
Open questions
- Spigot height and reach (est.): I used a spigot that sticks out about 2⅝″ and whose underside is about 2″ above the filter’s base. The front-apron top is ¾″ above the plate, which leaves about 1¼″ under the spigot. Measure yours with the filter in hand. If the spigot’s underside is less than about ½″ above the apron top, lower the front apron on the floor stand (make it 2″, or leave it out like the countertop stand).
- Filter diameter and base ring: the table is the makers’ figures, rounded, and a base ring wider than the body can eat a ¼″ of the gap. Measure the widest point of your base.
- Which filter and where it lives: the Imperial and Crown on the floor stand put the lid at 50–54″. If you refill from a standing position, drop the plate to 20″ (move the aprons, cleats and shelf with it), or choose a 6 gallon-class filter for the counter stand.
- Tumbler under the spigot: the floor stand fits vessels up to 12½″ tall (to the underside of the front apron); the cup circle in the drawings is a 30 oz tumbler, 3¼″ across.
- Shelf overhang: the shelf’s front tongue reaches 2½″ past the front rail so a cup can sit under the spigot. It is ¾″ hardwood, fine for a cup or a pitcher, but don’t load a gallon jug at the very edge.
- Is the leg taper worth it? It is the only shaped cut. Skip it (straight 1½″ legs) and the stand is a little heavier-looking but no weaker.
- Hardware: wall brackets, felt pads, plate screws and slotted-hole washers are not in the cut list.