Miter-Slot Tenoning Jig (Proposed)
A proposed shop jig for cutting the cheeks of tenons on the table saw: the stock stands on its end against a vertical fence, the jig rides in a miter slot, and one pass per face cuts each cheek. Plywood base and fence, a printed runner, shim set and brackets, and a plain C-clamp. It uses only the standard ¾″ × ⅜″ miter slot, so it fits any SawStop (measure your slot to confirm).
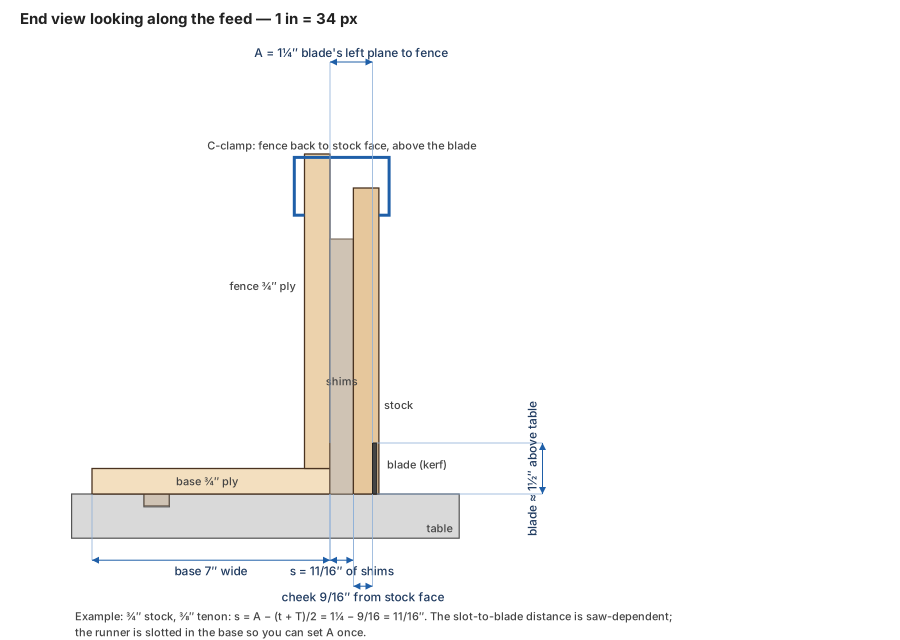
How it works. The blade’s distance from the fence is fixed once the jig is set up. Call the distance from the fence face to the blade’s near plane A (1¼″ here). Stack shims between the fence and the stock to move the stock toward the blade. The blade’s near plane then lands at (t + T) ÷ 2 from the stock face, where t is the stock thickness and T is the tenon thickness. Cut, turn the stock end for end, cut again, and the tenon is centered. The only setting is the shim stack: s = A − (t + T) ÷ 2.
This jig cuts the cheeks only. The shoulders are cut afterward on a crosscut sled or miter gauge with a stop, which also frees the waste.
Safety. The stock stands on end with its top well above the blade, so always clamp it — never hold it by hand — and stand to the side of the blade’s plane. Check that the guard or riving knife you are using clears the stock; the cheek kerf is only as deep as the tenon is long, so the riving knife usually runs in the kerf. Run a scrap through with the saw off first.
Drawings
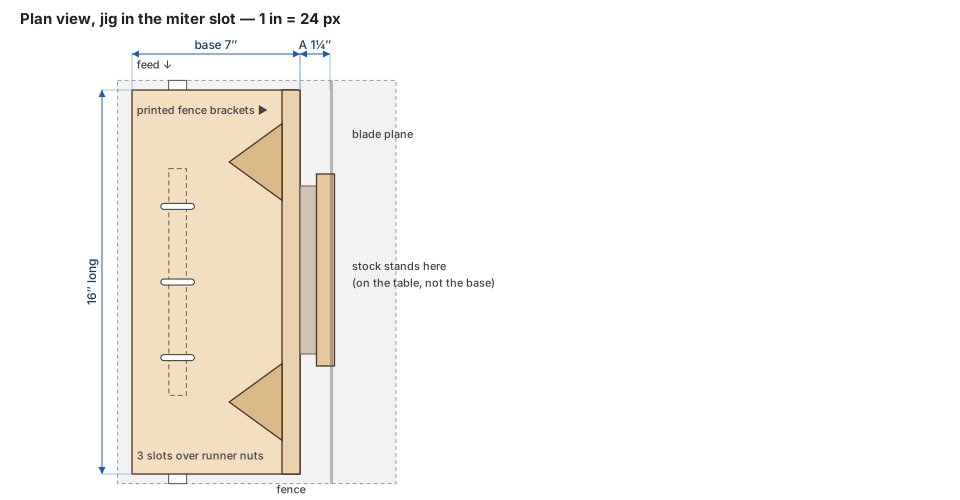
All dimensions in inches. Slot-to-blade distance depends on the saw, so the drawing shows a typical layout; the runner is slotted in the base so you set A once for your saw.
End view looking along the feed
Plan view
Shim table (A = 1¼″)
The shim set is 1/16″, 1/8″, 1/4″, 1/2″ and 1/2″, so every 1/16″ step from 0 to 1-7/16″ is reachable. The stock stands between the fence and the blade, and s is the stack between fence and stock.
| Stock t | Tenon T | s = A − (t + T)/2 | Shims |
|---|---|---|---|
| ¾″ | ¼″ | ¾″ | ¼ + ½ |
| ¾″ | ⅜″ | 11/16″ | 1/16 + ⅛ + ½ |
| ¾″ | ½″ | ⅝″ | ⅛ + ½ |
| ¾″ | ⅝″ | 9/16″ | 1/16 + ½ |
| 1″ | ¼″ | ⅝″ | ⅛ + ½ |
| 1″ | ⅜″ | 9/16″ | 1/16 + ½ |
| 1″ | ½″ | ½″ | ½ |
| 1″ | ⅝″ | 7/16″ | 1/16 + ⅛ + ¼ |
| 1½″ | ¼″ | ⅜″ | ⅛ + ¼ |
| 1½″ | ⅜″ | 5/16″ | 1/16 + ¼ |
| 1½″ | ½″ | ¼″ | ¼ |
| 1½″ | ⅝″ | 3/16″ | 1/16 + ⅛ |
For any other size, s = A − (t + T) ÷ 2, in 1/16″ steps; T = 2 (A − s) − t. If s comes out negative, the stock is too thick for this A — widen A by moving the base (see “Setting A”).
Parts
Wood and hardware
T × W × L.
| Part | Qty | Material | Size | Notes |
|---|---|---|---|---|
| Base | 1 | ¾″ Baltic birch | ¾ × 7 × 16 | Three cross slots, 7/32″ wide × 1⅜″ long, 3⅛″ apart, centered on the base, over the runner’s nut pockets |
| Fence | 1 | ¾″ Baltic birch | ¾ × 10 × 16 | Glued and screwed to the base’s long edge, standing on it; its face, square to the base, is the reference |
| Runner | 1 | Printed | 18.6 × 8.8 × 240 mm | The crosscut-sled runner from the printed-tools page; nuts in the pockets |
| Brackets | 2 | Printed | One at each end, on the back of the fence (see below) | |
| Handle | 1 | Printed | Screwed to the base behind the fence | |
| Shims | 2 sets | Printed | One set near the foot of the fence, one near the clamp, so the stock stays parallel | |
| Runner screws | 3 | M5 × 25 flat-head | Down through the base slots into the nuts in the runner | |
| Bracket screws | 8 | #8 × 1″ wood screws | 4 per bracket | |
| Clamp | 1 | 4–6″ C-clamp | Fence back to stock face, above the blade |
Printed parts
STLs and the parametric source are on the 3D-Printed Shop Tools page: the tenon shim set, the fence brackets, the handle and the sled runner.
Build
- Cut the base and fence to size from the same sheet. Cut the three cross slots in the base.
- Glue and screw the fence to the base’s long edge, with its face flush to the base edge. Square it to the base with a machinist’s square before the glue sets.
- Add the brackets on the back of the fence, one near each end, screwed into both the fence and the base. They hold the fence square under load.
- Fit the runner under the base: lay it in the miter slot, set the base on top, and run the M5 screws down through the base slots into the nuts. Leave them just snug.
Setting A (once per saw)
- Set the blade’s height to about 1½″ and the jig in the slot with no shims.
- Slide the base across (the runner slots allow ±⅜″) until the blade’s near plane is 1¼″ from the fence face. Measure with calipers from the fence face to the near side of the blade.
- Tighten the screws. Make a test cut in scrap with a known shim stack, and measure the tenon. Nudge the base if the tenon is off, and note the final A.
Using it
- Set the blade height to the tenon length. Use the setup depth blocks to check.
- Stack the shims for your stock and tenon sizes (table above) at the foot of the fence and again near the clamp.
- Stand the stock on its end against the shims, with the face you want against them. Clamp it with the C-clamp, fence back to stock face, above the blade.
- Push the jig past the blade. The kerf is the first cheek.
- Turn the stock end for end (180° about its length) so the opposite face is against the shims, clamp, and cut the second cheek. Both cheeks sit the same distance from their faces.
- Cut the shoulders on a crosscut sled or miter gauge with a stop block, freeing the waste.
- Test the fit in the mortise and adjust the shims by 1/16″ if needed.
Open questions
- Slot-to-blade distance on your saw determines whether the jig’s base fits left of the blade with A = 1¼″. If your slot is closer, shorten the base; if it is far, the base can be wider.
- Guard clearance. A crown guard may interfere with tall stock; remove it only if you have a safe alternative.
- Stock width. The clamp and fence are set for stock up to about 5″ wide; wider stock needs a taller fence.